

TAREA #1
- lopezcansinoz
- 12 feb 2017
- 1 Min. de lectura
CLASE N° 2 Y CLASE N° 3
VENTANA DE DIALOGO QUE INGRESA NOMBRE DEL USUARIO Y CLAVE Y
VENTANA DE DIALOGO QUE INGRESA NOMBRE DEL USUARIO Y CLAVE ACTIVANDO Y DESACTIVANDO EL BOTON DE COMANDO ACEPTAR
EMPEZAMOS:


CON LA CODIFICACION CORRESPONDIENTE :
void CApp06Dlg::OnChangeUsuario()
{
// TODO: If this is a RICHEDIT control, the control will not
// send this notification unless you override the
//CDialog::OnInitDialog()
// function and call CRichEditCtrl().SetEventMask()
// with the ENM_CHANGE flag ORed into the mask.
// TODO: Add your control notification handler code here
UpdateData(TRUE);
if
(m_Usuario.IsEmpty() || m_Clave.IsEmpty())
m_Aceptar.EnableWindow(false);
else
m_Aceptar.EnableWindow(true);
}
Como en el caso anterior ahora hacemos doble clic sobre la caja de texto Clave (IDC_CLAVE) y Escribir la siguiente codificación.
void CApp06Dlg::OnChangeClave()
{
// TODO: If this is a RICHEDIT control, the control will not
// send this notification unless you override the
//CDialog::OnInitDialog()
// function and call CRichEditCtrl().SetEventMask()
// with the ENM_CHANGE flag ORed into the mask.
// TODO: Add your control notification handler code here
UpdateData(TRUE);
if
(m_Usuario.IsEmpty() || m_Clave.IsEmpty())
m_Aceptar.EnableWindow(false);
else
m_Aceptar.EnableWindow(true);
}

AL COMPILAR

LUEGO PROCEDEMOS COLOCANDO EL NOMBRE DE USUARIO , VEMOS QUE EL BOTON ACEPTAR DEJA SE DESACTIVA
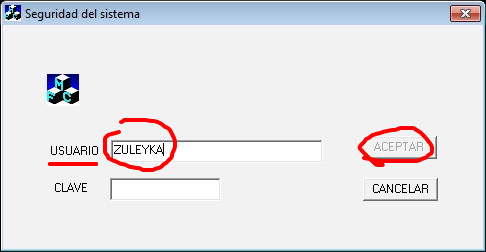
PERO AL COLOCAR LA CLAVE , ESTE SE VUELVE A ESTAR ACTIVO


Comentarios